Photoshop’s Generative Fill feature is a game-changer for photo editing. But let's be honest: when you try to add hair to a bald photo, half the time, the results look like a bad, fake wig.
You've seen the "perfect" examples. Now, this is the real guide.
We’ll show you the 5-step method to add hair with AI. More importantly, we'll show you why it sometimes looks fake (and how to fix it), based on our own tests.
How to Add Hair with AI in Photoshop (The 5-Step Method)
This process is simple, but the quality of your result depends entirely on Step 1 (your selection) and Step 3 (your prompt).
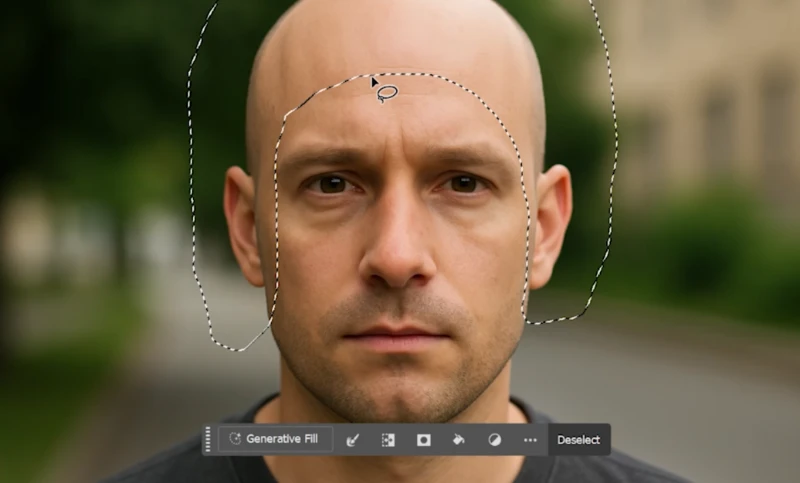
Step 1: Open Your Image & Select the Area (Lasso Tool)
First, open your photo. A clear, front-facing shot where the face is clearly visible works best.
From the toolbar, grab the Lasso Tool (L). Make a selection over the area where you want to add the hair. This is the most critical step.
For short hair (like a buzzcut): A tight selection just around the scalp is fine.
For longer hair: Be more generous. Draw the selection across the top of the forehead and include the area behind the ears where the hair would naturally fall.
The key is to select a wide enough area based on the hairstyle you plan to add.
Step 2: Activate Generative Fill
Once your selection is active, the Generative Fill context bar will appear. Click the Generative Fill button.
Step 3: Write Your Prompt (English is Key)
A text field will appear. Describe the type of hair you want. Based on all our tests, it is best to write your prompt in English to get the most accurate and high-quality results.
Start simple. Type your prompt (e.g., "black hair") and click the Generate button.
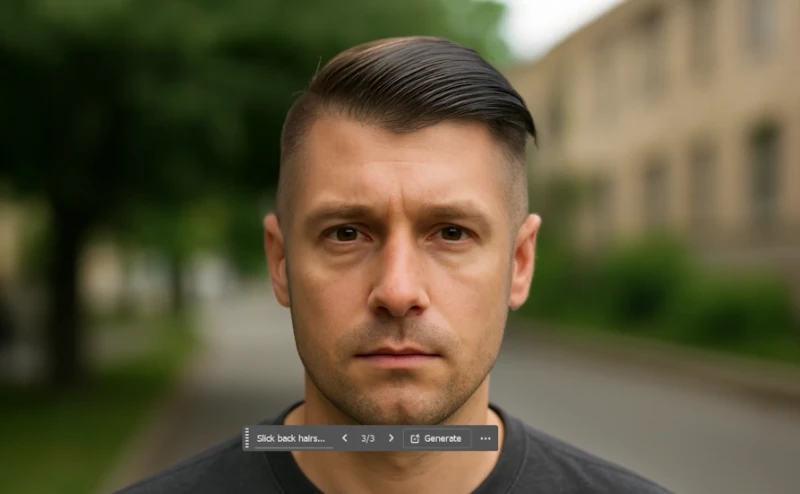
Step 4: Generate and Review the 3 Variations
Photoshop analyzes the lighting, shadows, and facial structure of your image to make the added content look realistic.
After a few seconds, the AI will offer three different hairstyle suggestions. You can see these in the "Variations" section of the Properties panel. Click through them to see which one looks best.
Step 5: Refine Selection or Regenerate
If none of the options look good, do not give up. This is normal.
Try again: Click the Generate button again. The AI will give you three brand new options based on the same prompt.
Refine your prompt: Try a different description (e.g., "wavy dark hair" instead of "black hair").
Fix your selection: If the hair looks completely wrong (e.g., growing from the wrong place), your selection was bad. Press (Ctrl/Cmd + D) to deselect, and go back to Step 1.
Why Does My AI Hair Look Fake?
This is the most important part of the guide. The AI is powerful, but it's not perfect. Here are the common problems we found during testing and how to fix them.
Problem 1: It Looks Like a Wig or "Fake"
This is the most common complaint. The hair itself looks okay, but it looks "stuck on" the head.
The Cause: This usually happens because the AI struggled with the lighting and shadows of your original image. The generated hair doesn't match the ambient light.
The Fix: You often need to run Generative Fill a few times (regenerate) before it finds a version that correctly matches the lighting. If it's still not right, you may need to manually add a new layer and paint in subtle shadows where the hair meets the forehead to "ground" it.
Problem 2: Hair is Growing from the Middle of the Forehead
You made a selection, and the AI generated hair that starts way too low, right above the eyebrows.
The Cause: This is almost always a selection problem. Your selection was likely too low on the forehead, or you accidentally included parts of the face.
The Fix: Undo (Ctrl/Cmd + Z) and re-do your Lasso selection. Make sure your selection only covers the scalp and the areas where hair would naturally be.
Problem 3: The Style Looks Unnatural (or Goes the Wrong Way)
You asked for long hair, but it's floating sideways, or you asked for bangs, but they look like a helmet.
The Cause: This often happens with photos taken from weird angles. The AI gets confused about perspective. Also, your prompt might be too vague or too complex.
The Fix: Stick to simple, clear prompts. If the angle is too complex, the feature might fail for that specific photo.
The Best Prompts for Realistic Hair (Examples We Tested)
What you write in the prompt box is crucial. Clear and simple is always better.
These prompts gave us great, realistic results with just 1-2 generations:
"Short black hair"
"Curly brown hair"
"Long straight blonde hair"
"Buzz cut" (This works surprisingly well)
"Wavy dark hair"
"Slicked back hairstyle"
You can experiment however you like, but you can also use Generative AI for other complex tasks, like creating a custom action figure of yourself from a simple photo.
Prompts That Can Fail (Based on Our Tests)
We also found that very specific, complex prompts can confuse the AI.
In one test, we used "messy curly hair with bangs." The AI generated great "messy curly hair," but it completely ignored the "bangs" part in all 3 variations. This shows the AI's current limitations. If a detail is ignored, try a simpler prompt first, or generate the bangs as a separate selection.
A Surprising Use: Virtual Hair Transplant Previews
This tool isn't just for fun. Some people are using this feature to get a realistic preview of what they might look like after a hair transplant.
By selecting the receding or thin areas and using a prompt like "short black hair," you can generate a realistic visualization of different styles to decide what suits you best, all without the actual procedure.
Quick Requirements: What You Need to Use This Feature
You can't use this AI tool on just any version of Photoshop. There are two critical requirements:
An updated version of Photoshop (2023 or later). This feature does not exist in older versions.
An active internet connection. The AI processing happens on Adobe's servers (in the cloud), not locally on your machine. If you are not connected to the internet, Generative Fill will not work.