You are building an automated image generation workflow in n8n, but the fal.ai API keeps throwing a 422 error on your GET request. Or maybe your workflow loops infinitely because the API key formatting is slightly off. Integrating fal.ai with n8n requires a specific polling logic, and skipping a single header configuration breaks the entire setup.
Why Choose fal.ai Over Midjourney for API Workflows?
Midjourney produces stunning visuals, but it forces you into a cumbersome Discord bot infrastructure. There is no official REST API for direct automation. This creates massive friction for developers looking to scale content creation.
fal.ai offers a direct API endpoint. You send a payload, check the status, and receive a clean image URL. You skip the unofficial workarounds and avoid the constant risk of rate limits or bot bans. The infrastructure handles bulk generation for blog covers or social media campaigns without any Discord involvement.
Understanding the Polling Logic in n8n
Most standard APIs use a fire-and-forget method: you send a request, and the server instantly replies with your data. Heavy AI rendering tasks do not work this way. Generating a high-resolution image takes time, and if n8n waits idly for the final image, the connection times out.
Polling solves this. You send the initial prompt to fal.ai and receive a request ID immediately. Your n8n workflow then enters a loop: it waits a few seconds, asks the server if the image is ready, and repeats until the status changes to COMPLETED. You control the timing and prevent timeout crashes.
Step-by-Step: Building the fal.ai Image Generation Workflow
Step 1: Formatting the fal.ai API Key Correctly
This is where most setups fail. fal.ai does not use the standard Bearer token format. Open your n8n credentials panel and create a new Header Auth. Name the header Authorization. For the value, type Key followed by a single space, then your API key:
Key YOUR_API_KEY
Using Bearer YOUR_API_KEY or pasting the key without the Key prefix returns an immediate authentication error. The space after Key is mandatory.
Step 2: Sending the Initial Prompt (HTTP POST)
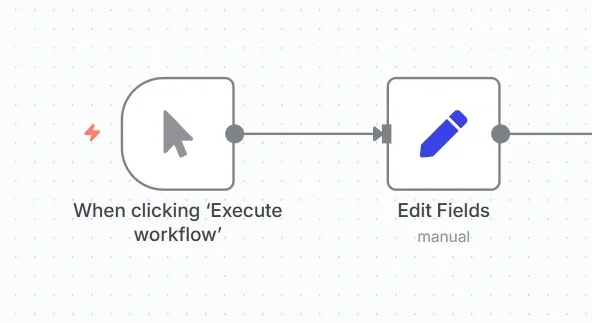
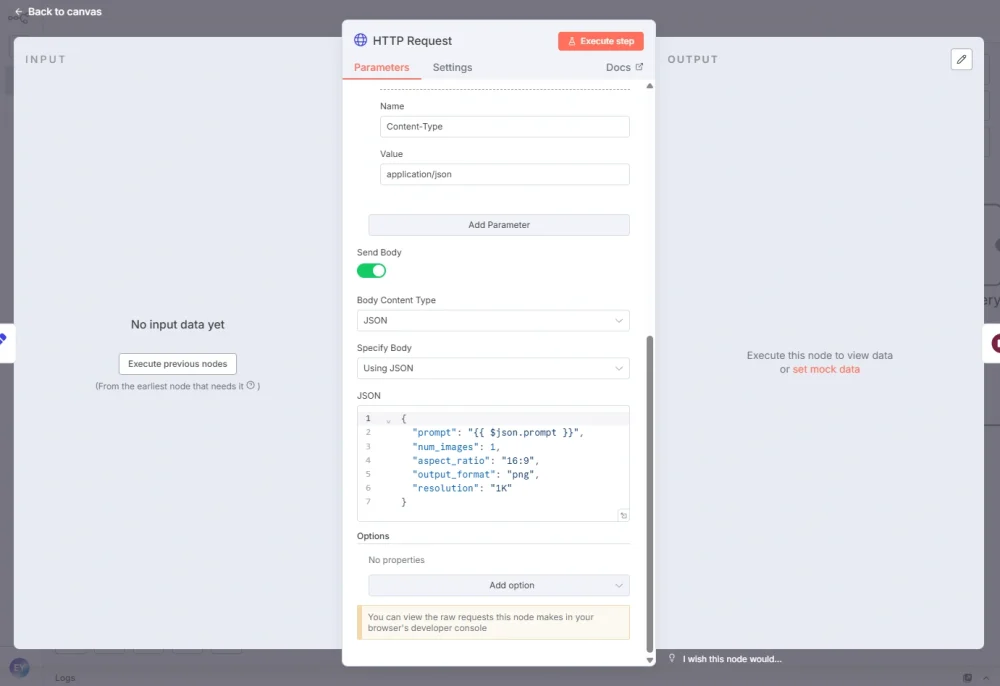
Set up a Manual Trigger node, followed by an Edit Fields node to define your image prompt. Connect this to an HTTP Request node configured as follows:
- Method: POST
- URL: The fal.ai submit endpoint for your chosen model (e.g.,
https://queue.fal.run/fal-ai/flux/dev) - Body type: JSON, with your prompt field passed dynamically
When this node executes, you do not receive an image. You receive a confirmation response containing a unique request_url. Store this value; it is required for the polling phase.
Step 3: Wait Node and Status Check (HTTP GET)
Add a Wait node set to 5 seconds. This gives the AI engine processing time before you begin polling.
After the Wait node, add another HTTP Request node:
- Method: GET
- URL: The
request_urlfrom Step 2 (use n8n's expression mode to reference the previous node output) - Authorization: Same header format as before
This returns a status payload: either IN_PROGRESS or COMPLETED.
Step 4: Routing with the If Node
Add an If node after the GET request. Configure it to check the status field:
- Status equals
COMPLETED→ True path: proceed to retrieve your final image URL - Status equals
IN_PROGRESS→ False path: loop back to the Wait node
The workflow cycles through Wait and GET until rendering finishes. In typical conditions, a 16:9 image via Flux completes in 4 to 5 polling attempts (roughly 20 to 25 seconds).
Add a max-retry counter. Without a cap, a stalled fal.ai job will loop your workflow indefinitely. Add a counter field in your Edit Fields node, increment it on each false-path loop using an expression like {{ $json.retryCount + 1 }}, and add a second condition to the If node: if retryCount exceeds 20, route to an error path. This prevents silent infinite loops in production.

Common Errors and Fixes
The 422 Unprocessable Entity Error on GET Requests
This is the most common bug in n8n polling workflows. By default, n8n carries the JSON body from your POST node into the next HTTP node. The fal.ai status endpoint expects a clean GET request with no body. When it receives the leftover payload, it rejects it with a 422 error.
Fix: open your GET node settings and explicitly set Send Body to OFF. Clear the body field if it is populated. The error disappears immediately.
The 405 Method Not Allowed Error
A 405 error means you are hitting the correct URL but using the wrong HTTP method. This typically happens when you copy the POST node configuration for your status check and forget to change the method to GET.
Check each node individually: submit is always POST, status check and result retrieval are always GET.
Zero Balance Mid-Workflow
If your fal.ai account runs out of credits while the polling loop is active, the API stops returning IN_PROGRESS and throws a 402 or 500 error. The workflow fails abruptly, losing any batch data in progress.
Add an Error Trigger node to your workflow. Connect it to an If node that checks {{ $json.error.statusCode === 402 }} to isolate balance errors from other failures. Route the 402 path to a Slack or email notification so you can top up and restart cleanly, while other error types route to a separate logging path.
Choosing the Right Model: Flux vs. Nano Banana
fal.ai offers multiple models. Your choice directly affects processing time and output quality.
Flux produces highly photorealistic, prompt-obedient results. It is the right choice for professional blog covers and marketing assets where detail matters. Average generation time is 10 to 15 seconds.
Nano Banana trades absolute detail for speed, generating images in under 3 seconds. Use it for rapid social media prototyping or real-time application features where throughput matters more than hyper-realism.
Both models use the same polling workflow structure. Switching between them only requires changing the submit URL.
n8n Cloud vs. Self-Hosted: What Changes
On n8n Cloud, memory management is handled automatically. The 5-second polling loop runs without resource concerns, even for long-running batches.
On self-hosted n8n (especially low-tier VPS), rapid polling fills up the execution database fast. Before running bulk generation, go to your workflow settings and disable saving successful executions. This prevents disk space exhaustion during high-volume runs.
If you are generating images for product photo enhancement workflows or need a no-code alternative for visual content, fal.ai's Google ImageFX also offers a browser-based interface worth testing for one-off generation.
For automated pipelines at scale, the n8n polling approach described here is the more reliable path. You can also use this same workflow to power AI action figure creation by combining fal.ai with a custom prompt template node.
Start with the authentication format fix in Step 1 before debugging anything else. Once the POST confirms and returns a request_url, add the max-retry counter before deploying to production. Those two details separate a workflow that works from one that works reliably.