Stop wasting thousands of dollars on physical studio setups or struggling with basic AI tools that warp your actual product shapes. Mastering Krea AI requires specific prompt formulas and exact slider values, not just uploading a photo and hoping for the best.
- Ideal Strength Setting: 0.85 (Start here for most products)
- Maximum Resolution: 22K (Requires gradual upscaling)
- Credit Cost: 1 credit per scene transfer generation
- Surface Rule: Matte objects tolerate higher AI creativity than reflective surfaces
The Complete Krea AI Product Workflow
Preparing Your Raw Assets
Your base image must have decent lighting before it even touches the AI. Krea cannot fix a pitch-black shadow cast across your main label. Ensure the product is clearly visible against a relatively plain background so the AI detects the exact edges perfectly.
Navigating the Scene Transfer Module
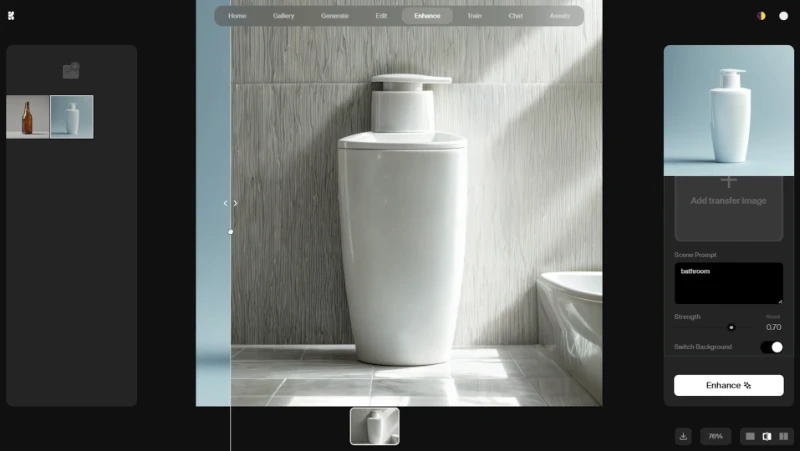
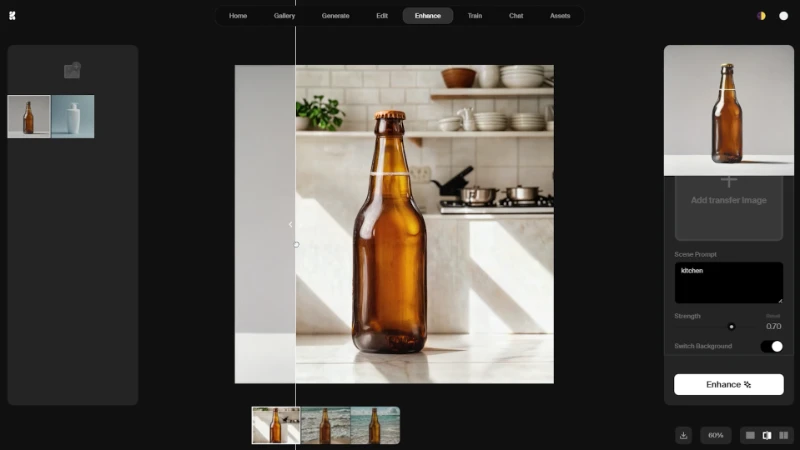
Skip the basic upscaler at first and head straight to the Scene Transfer tab. Upload your prepared asset directly into the workspace. You will notice a slider and a prompt box appearing below your image immediately.
Mastering the Technical Settings
Clarity vs Sharpness
Both sliders appear in the Enhancer panel after you upload your image. Sharpness purely enhances the edges of your pixels, making the existing lines harsher. Clarity actually adjusts the mid-tone contrast, giving your product that expensive, three-dimensional studio pop without looking heavily edited. For most product shots, prioritize Clarity over Sharpness.
Why You Must Start at 0.85 Strength
Pushing the AI strength to 1.0 completely hallucinates a new product. Dropping it to 0.5 leaves messy remnants of your original bedroom wall in the background. Setting your strength exactly to 0.85 acts as the perfect sweet spot. This value forces Krea to respect your product's original geometry while fully replacing the environment.
The Product Category Prompt Matrix
Prompt Engineering with Camera Lens Vocabulary
Typing generic phrases like on a table produces cheap-looking results. You must speak to Krea like a professional photographer. At the end of your Scene Prompt, append terms like Sony G Master 50mm, f/1.8 aperture, and volumetric lighting. This forces the AI engine to generate realistic depth of field and professional bokeh behind your subject. The formula: describe the environment first, then close with the camera/lens vocabulary.
Settings for Reflective Cosmetics and Jewelry
Glass bottles and silver rings reflect their environment inherently. If you place a perfume bottle on a beach, the AI struggles to map the sand reflection onto the glass. You need to drop your strength to 0.75 for these highly reflective materials. Keep your prompts focused on studio environments like softbox lighting or acrylic pedestal to avoid weird environmental reflections on your product.
Settings for Matte Tech and Furniture
Matte electronics or wooden furniture hold their shape incredibly well under AI manipulation. You can push the strength slider up to 0.90 for these categories. They absorb light predictably, allowing you to use wilder prompts like cyberpunk neon background or sunlit forest floor without distorting the core product.
The Safe Upscaling Strategy
Stepping from 2x to 4x Without Artifacts
Krea boasts an impressive 22K maximum resolution capability, but jumping straight to the maximum setting destroys the image instantly. The AI fills the sudden massive pixel gap with weird artifacts and distorted textures. You must upscale to 2x first, save the result, and then run that new image through a 4x upscale. This gradual stepping technique preserves the integrity of your original product labels perfectly.
Troubleshooting Common Generation Errors
Fixing Unwanted Background Remnants
Sometimes Krea leaves a ghosted outline of your original background hovering near the edges of your item. This happens when the original photo lacks contrast. You need to increase the prompt weight of your background description. Adding terms like completely empty background or pure white studio sweep forces the AI to overwrite those stubborn pixels.
Stopping Krea from Altering the Product Shape
If your square box suddenly looks slightly curved, your strength setting is too high for that specific angle. Immediately lower the strength by 0.10 and generate again.
If the distortion persists, try re-uploading the photo from a straight-on angle rather than a perspective shot, Krea handles orthographic product angles more reliably than angled shots with heavy perspective. If you want to explore what other AI image tools are capable of before committing to Krea, the Google ImageFX hands-on review covers a direct comparison on generation quality and creative control.
Krea AI vs PhotoRoom and Mokker
Basic tools like PhotoRoom simply cut out your product and paste it onto a flat background. Krea fundamentally recalculates the lighting. When you place a product on a generated table in Krea, the AI creates accurate contact shadows and bounce light that matches the new environment.
Mokker offers similar capabilities, but Krea provides far more granular control over the exact generation strength. If you are already experimenting with AI-generated visuals beyond product shots, creating a custom AI action figure follows a similar prompt-engineering logic and is worth trying next.
Cost Analysis for E-Commerce Processing
Running a batch of 100 product visuals through a traditional studio easily costs thousands of dollars and takes weeks. With Krea, those same 100 images cost a fraction of that. The free tier includes daily credits sufficient for testing and small batches.
Paid plans add significantly more generation capacity, check the current credit limits and pricing directly on krea.ai/pricing since plan details change regularly. For teams processing an entire Shopify catalog, the math typically favors Krea within the first month of consistent use.