That distinctive crunch sound when your laptop hits the floor is a nightmare every user dreads. You open the lid, hoping for the best, but you are greeted by spiderweb cracks, bleeding ink spots, or a display that looks like modern abstract art. Before you panic or spend a fortune on a new device, take a breath. While a broken screen looks catastrophic, it is often one of the most manageable DIY repairs you can perform.
Many users assume a cracked screen signals the end of their laptop's life. In reality, the LCD panel is just a peripheral component, much like a keyboard or a battery. If the rest of the computer works, replacing the panel is significantly cheaper than buying a new machine. This guide will walk you through diagnosing the damage, finding the exact replacement part, and swapping it out safely.
Diagnosis: Is Your Screen Actually Broken?
Before ordering parts, you must confirm that the LCD panel is the only culprit. Sometimes, a loose cable or a dying graphics card (GPU) can mimic a broken screen.
The definitive way to test this is the External Monitor Test. Connect your laptop to a TV or desktop monitor using an HDMI or VGA cable.
If the external image is clear: Your graphics card and motherboard are fine. The damage is isolated to the laptop screen or its video cable. Proceed with the replacement.
If the external image has the same artifacts: The issue is likely with your GPU or motherboard. Replacing the screen will not fix this.
If you don't see physical cracks but are experiencing flickering or weird colors, it might be a driver issue. Try booting into Safe Mode to see if the problem persists with basic drivers. You can follow our guide on how to start computer in safe mode to rule out software conflicts.
Repair vs. Replace: Is It Worth Fixing?
Not all screens are created equal. The economic viability of a repair depends heavily on the type of device you have.
Laptops: Almost always worth it. A replacement panel typically costs between $50 and $100, whereas a decent new laptop costs over $600. The repair takes about 30-60 minutes.
Standalone Desktop Monitors: Usually not worth it. The LCD panel inside a monitor accounts for 80-90% of the manufacturing cost. Unless it is a very high-end professional monitor, buying a new one is often cheaper than sourcing a panel.
Touchscreens & Convertibles: Proceed with caution. Touchscreens often have the glass digitizer bonded to the LCD. Separating them requires expensive equipment. For these, you usually need to replace the entire top lid assembly, which can be pricey.
How to Find the Correct Replacement Screen
This is the most critical step where most beginners make a mistake. Do not order a screen based solely on your laptop model (e.g., Dell Inspiron 15 screen). Manufacturers often use different screen suppliers (LG, Samsung, AU Optronics) for the exact same laptop model, and they may have different connector types.
To get the right part, you must remove the broken screen first and look at the label on the back. You are looking for a specific manufacturer code, such as LP156WH4 or B156XW02.
Pay close attention to the video connector:
30-pin connector: Standard for most modern screens.
40-pin connector: Used in older screens or high-refresh-rate/4K panels.
If you order the wrong pin count, it will not fit, even if the screen size is the same.
Step-by-Step Guide: How to Replace a Laptop Screen
If you have your replacement screen ready, clear a table and grab a small Phillips screwdriver (usually PH0 or PH00) and a thin plastic tool (a guitar pick or credit card works well).
Step 1: Power and Safety (Crucial)
This step separates the pros from the amateurs. Completely shut down your laptop and unplug the AC adapter. If your laptop has a removable battery, remove it.
If your battery is built-in, you should disable it in the BIOS or carefully disconnect the battery connector from the motherboard before touching the screen cable. The video cable carries a constant voltage for the backlight. If you fiddle with it while the battery is connected, you risk blowing a fuse on the motherboard, which kills the backlight permanently.
Step 2: Remove the Bezel
The bezel is the plastic frame surrounding the screen. On older laptops, there are rubber screw covers at the corners. Peel these off to reveal the screws. On modern laptops, the bezel is usually held in place by plastic clips or adhesive.
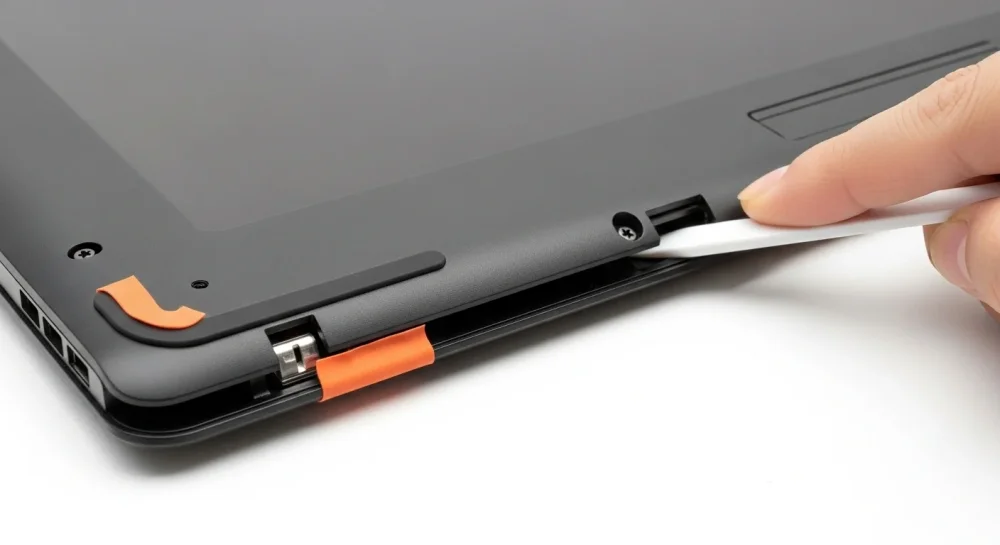
Use your fingers or a plastic pry tool to gently separate the bezel from the rear lid. Start from the inside edge and work your way around. If you feel resistance, check for hidden screws. You might hear snapping sounds; this is normal for the plastic clips disengaging.
Step 3: Detach the Broken Panel
Once the bezel is off, you will see the bare LCD panel. It is typically secured by four small screws on mounting brackets (tabs) at the top and bottom, or sometimes on the sides. Remove these screws and keep them safe; they are tiny and easy to lose.
Gently tilt the screen forward onto the keyboard area. Be careful, as the video cable is still connected to the back.
Step 4: Disconnect the Video Cable
You will see a video cable connected to the bottom back of the screen. It is usually secured with clear tape.
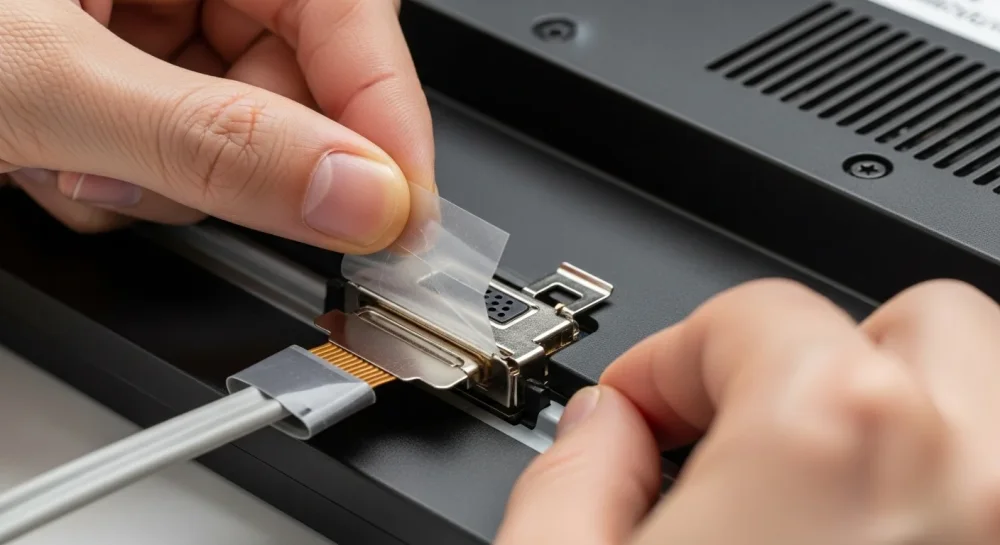
Peel up the tape gently.
Many connectors have a small metal locking bar. Flip it up if present.
Gently pull the connector straight back, do not pull up, or you might damage the delicate pins.
Step 5: Install and Test
Place your new screen face down on the keyboard (cushion it with a cloth). Connect the video cable, secure the locking bar, and reapply the tape.
Before you screw everything back together:
Reconnect the battery and AC adapter.
Turn on the laptop.
Check if the screen lights up and shows the desktop.
If it works, shut it down again, screw the panel into the lid, and snap the bezel back on. If you encounter software glitches or weird artifacts after installation, it's worth checking if your graphics settings need a refresh. Sometimes a quick system reboot is all it takes; you can do this quickly using commands if your interface is tricky to navigate, as explained in our reboot windows cmd guide.
What About Dead Pixels?
Sometimes a replacement screen might arrive with a dead pixel. While annoying, this doesn't mean the screen is broken. Manufacturers have ISO standards that allow a certain number of dead pixels (usually 2-5) before they consider it defective. If you need to verify if a spot is dirt or a dead pixel, you can use online screen test tools that cycle through solid colors.