

Few things kill your momentum quite like sitting down, hitting play on a video, and getting hit with dead silence. Before you start spiraling, take a breath: this almost always comes down to a stealthy Windows update, an output setting that quietly switched itself, or a stubborn driver acting up.
You definitely don’t need to wipe your drive and reinstall Windows over this. I’ve spent years troubleshooting these exact sound headaches, and walking through these fixes from the simplest checks to the slightly deeper tweaks usually gets things working again in no time.
Honestly, nine times out of ten the hardware is completely fine - it’s just a piece of software pointing the signal in the wrong direction, which takes maybe two minutes to untangle.
First Response: Hardware and Connection Checks
Before we mess around with device menus, let’s rule out the basic physical hiccups that catch everyone off guard. More often than you’d think, the fix is literally just a cable plugged into the wrong hole or sitting slightly loose.
If you’re running desktop speakers or a wired headset, double-check that 3.5mm plug. On desktop towers, you want the lime green jack for stereo output, not the pink mic jack or the blue line-in. If you’re using a USB headset or external DAC, try swapping it into a different USB port on the back of the motherboard, since front-panel ports can sometimes deliver flaky power or data.
Next, pop open your taskbar volume control in the bottom-right corner. Obviously verify the slider isn’t sitting at zero, but pay special attention to the output device name.
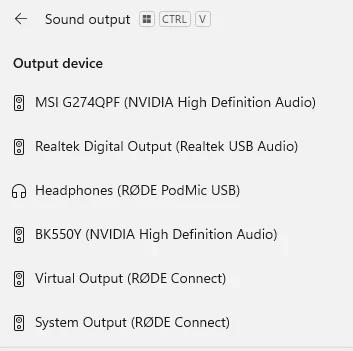
Click the little arrow next to the volume bar to open your device list and make sure your actual speakers or headphones (like "Speakers - Realtek Audio") are selected. Windows loves defaulting to monitor audio after updates, and if your monitor doesn’t actually have built-in speakers, you’ll just get silence.
Disable Windows Audio Enhancements
Both Windows 10 and 11 come loaded with post-processing audio enhancements designed to boost bass or simulate surround sound. In practice, though, these extra filters frequently clash with older hardware or specific audio drivers, killing the audio stream entirely. Stripping away that extra processing layer is often an instant fix.
Head over to Settings > System > Sound.
Scroll down to your output device and click on it under the All sound devices or advanced properties section.
Find the Audio Enhancements dropdown (or head into the classic properties window if you're on an older build).
Switch the setting to Off, or tick the box that says Disable all enhancements, then hit Apply.
If you like tweaking system-level environments on Windows 11, you might be used to digging into deeper tools like enable Hyper-V Windows 11, but for troubleshooting sound, keeping signal processing as bare-bones as possible is your best bet.
Solving Driver Issues at the Root
This right here is where most audio mysteries get solved. Usually, people tell you to click "Update driver," but Windows almost always brushes you off with that unhelpful "The best drivers are already installed" message. Instead of letting Windows guess, we’re going to force it to swap drivers manually.
Right-click your Start button and open Device Manager.
Scroll down and expand the Sound, video and game controllers category.
Right-click your main sound device (usually something like Realtek High Definition Audio) and click Update driver.
Select Browse my computer for drivers, then click Let me pick from a list of available drivers on my computer.
You’ll see a list of compatible drivers pop up. Look for the generic High Definition Audio Device provided by Microsoft, select it, and click Next.
This tells Windows to abandon the vendor’s custom software stack and fall back to the universal, rock-solid baseline driver. Give your PC a quick restart, and in most cases, your audio will kick right back on.
Restarting Windows Audio Services
Sometimes your driver and hardware are totally fine, but the underlying background service handling audio inside Windows simply locked up. A full system reboot can reset it, but you don’t need to jump into terminal tricks like reboot Windows CMD just to nudge a stubborn background process back to life.
Tap Windows + R on your keyboard, type services.msc, and hit Enter.
Scroll down the list until you spot the Windows Audio service.
Right-click on it and hit Restart.
Do the exact same thing for the Windows Audio Endpoint Builder service right next to it.
Doing this forces Windows to dump its active audio cache, kill any frozen audio threads, and rebuild the connection between your software and physical ports on the fly.

BIOS and Chipset Checks
If you’ve made it this far with zero sound, we need to check the motherboard level. This comes up a lot right after a clean Windows install or a recent BIOS update, where motherboard defaults can accidentally toggle the onboard audio chip to "Disabled."
Restart your PC and tap F2 or Del right as it turns on to enter the BIOS menu. Hunt around in sections named Integrated Peripherals or Onboard Devices Configuration and verify that your onboard audio controller is explicitly set to Enabled.
While you’re at it, grab the official Chipset drivers from your motherboard manufacturer’s support page; without working chipset drivers, Windows can’t properly route traffic to the sound card. If you run into weird network errors while grabbing those files, you can check our guide on the DNS probe finished nxdomain error to rule out connection hangs preventing driver downloads.